The world of custom mechanical keyboards
Most people who have used mechanical keyboards can attest to their superiority over “regular” keyboards. But what is a mechanical keyboard? As it turns out, defining what exactly is a mechanical keyboard isn’t straight forward. Nonetheless, most people intuitively understand what is meant by the term, especially if they have used something besides mushy rubber-dome keyboards.
The relentless drive to make things cheaper hasn’t spared something as serviceable and ubiquitous as the computer keyboard. The world has moved on to making the keyboard as cheap as possible at the cost of sacrificing durability, comfort, aesthetics and sound.
Mass-produced, RGB-focussed mechanical “gaming” keyboards have existed for years, but they remain a product coveted mostly by credulous gamers. Beyond mass-produced mechanical keyboards exists the esoteric world of custom mechanical keyboards. People who love mechanical keyboards and want to further their experience, spiral into this addictive, endless rabbit hole of customization.
It’s possible to build a custom mechanical keyboard for a reasonable price, but the price of the components depends on local availability and demand, shipping rates, import duty and so on.
Customizing keyboards
There are four main aspects to customizing a keyboard:
-
Form: How the keyboard looks, its shape and dimensions.
-
Function: How the keyboard functions and its features.
-
Feel: How typing on the keyboard feels.
-
Sound: How typing on the keyboard sounds.
While the significance of each aspect varies by personal preference, each aspect offers a wide spectrum of quality and customization options. From buying off-the-shelves parts and assembling a keyboard to commissioning Rolls Royce-esque, made-to-order personalized masterpieces, the range is staggering.

The appeal for custom mechanical keyboards has been steadily growing and they’re more accessible today than ever before. Nonetheless, they remain a niche market where demand heavily outweighs supply. It’s a market gated not just by price but other factors like exorbitant shipping fees, inconsistent quality control, lack of warranties and RMAs for refunds and repairs.
Since demand heavily outweighs supply, limited editions and Group-Buys are the only way to get certain products. Group-buys are buyer-beware projects primarily intended to protect the seller from risk. They were originally organized by enthusiasts with design and manufacturing capabilities. As interest grew, a few small but trustworthy companies offering group-buys for products have emerged. It’s advisable to verify the reputability of the individuals or companies offering group-buys before pre-ordering their products.
In a group-buy, customers pre-order a product before its production commences. If there isn’t sufficient demand, production is usually cancelled and pre-orders are refunded. The exclusivity of products is ramped up by short and infrequent pre-order windows. Sometimes products are never made again or could take years before they’re available again. And even for products that do get produced through group-buys, it can take years for it to get to delivered to customers. This delay between pre-ordering and delivery may be a deterrent for newcomers, but that’s the just the way it is in this hobby.
Before getting into the custom keyboard scene, it’s important to know as much about mechanical keyboards as possible. In line with the scientific methods of our times, what better way to study a machine than by reducing it to the sum of its parts.
The anatomy of a mechanical keyboard
If you’re looking to assemble a mechanical keyboard, you should familiarize yourself with the anatomy of a typical mechanical keyboard. Even if you’re buying a fully assembled keyboard to tweak it, like swapping switches or keycaps, it’s a good idea to know what you’re getting into. Learning the intricate details will help you appreciate the scope of customization, discern differences in quality and make better informed decisions.
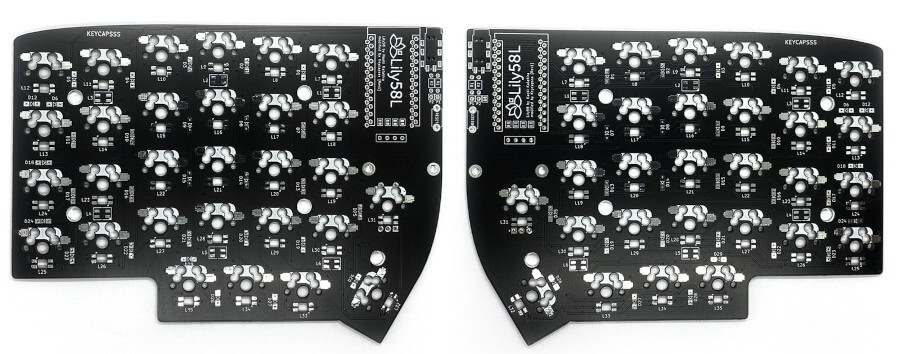
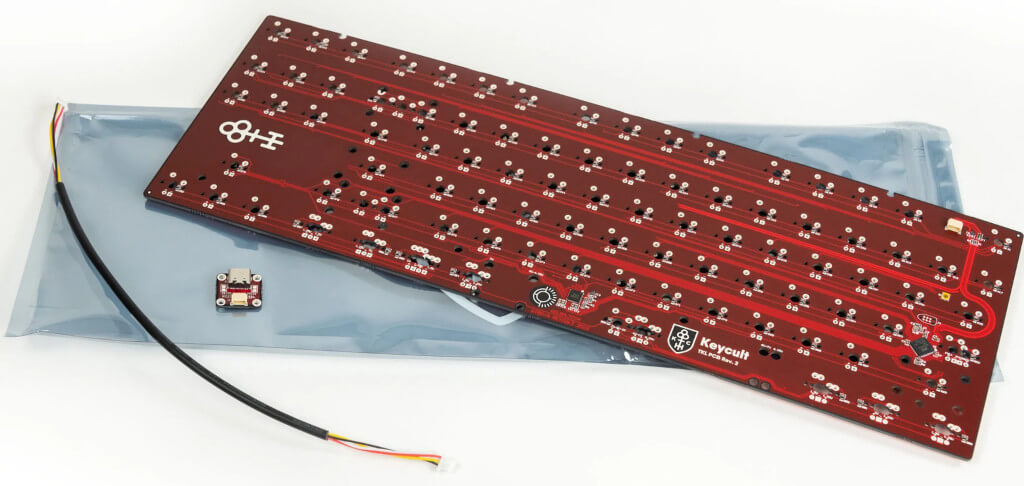
PCB
The PCB (Printer Circuit Board) is the heart of any computer keyboard. It’s a physical mechanism that houses the electronic components of the keyboard. While it’s technically possible to build a keyboard without a PCB by wiring switches directly to a controller,[1] almost all off-the-shelf and custom keyboards have a PCB.
If you’re assembling a keyboard from scratch, you should start with finding a PCB that suits your requirements. The PCB defines the features of a keyboard and is paramount to its reliability and lifespan. The PCB will also determine the size and layout of the keyboard and the type of switches to use. The more exotic your requirements, the harder it is to find a suitable PCB.
Here are some key factors to consider while choosing the PCB.
-
Form: Ergonomic, split, regular, southpaw etc.
-
Layout: Full size, TKL (tenkeyless), compact etc.
-
Switch installation type: Hot-swappable or soldered.
-
Switch mount type: Plate-mounted or PCB-mounted.
-
Connectivity: Wired (type-C or micro USB) or wireless (Bluetooth).
-
Lighting: RGB backlighting features.
-
Firmware and its features. QMK is the most popular, open-source firmware choice.
It’s not uncommon for those investing in expensive, top-of-the-line keyboards, to buy extra PCBs to prolong the lifespan of the keyboard and to have replacements at hand if the PCB were to become unavailable in the future. Often, PCBs of higher-end keyboards can be resold in the aftermarket for an inflated price as they’re likely to be in high demand.
While it’s possible to design and fabricate your own PCB from scratch, only few people do this as it requires substantial expertise and access to suitable manufacturers.
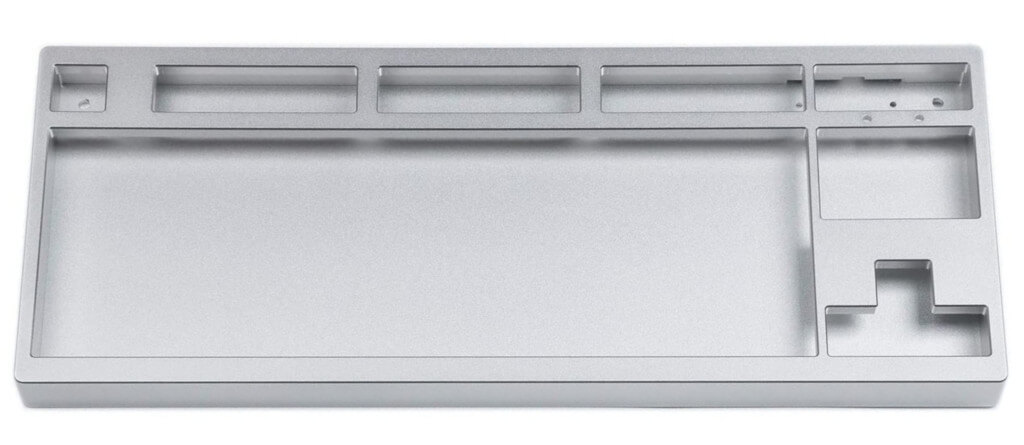
Case and Plate
The keyboard case, chassis or frame is the physical housing of the keyboard. Cases are typically made from aluminium, stainless steel, brass, acrylic, polycarbonate or composite materials like FR4. Different finishing techniques like electroplating, brushing, powder coating and sand-blasting are used to improve appearance and durability. Some manufacturers even offer custom engraving for their cases. Cases can also be crafted using wood but for some reason aren’t very popular.
Many cases are designed to be used with plates, which determine how to mount or sandwich the PCB with the case. The plate is usually aluminium, stainless steel, brass, polycarbonate or carbon fibre. The material and thickness of the plate helps in alleviating the stress exerted on the PCB while bottoming-out keys and offers stability and firmness while typing.
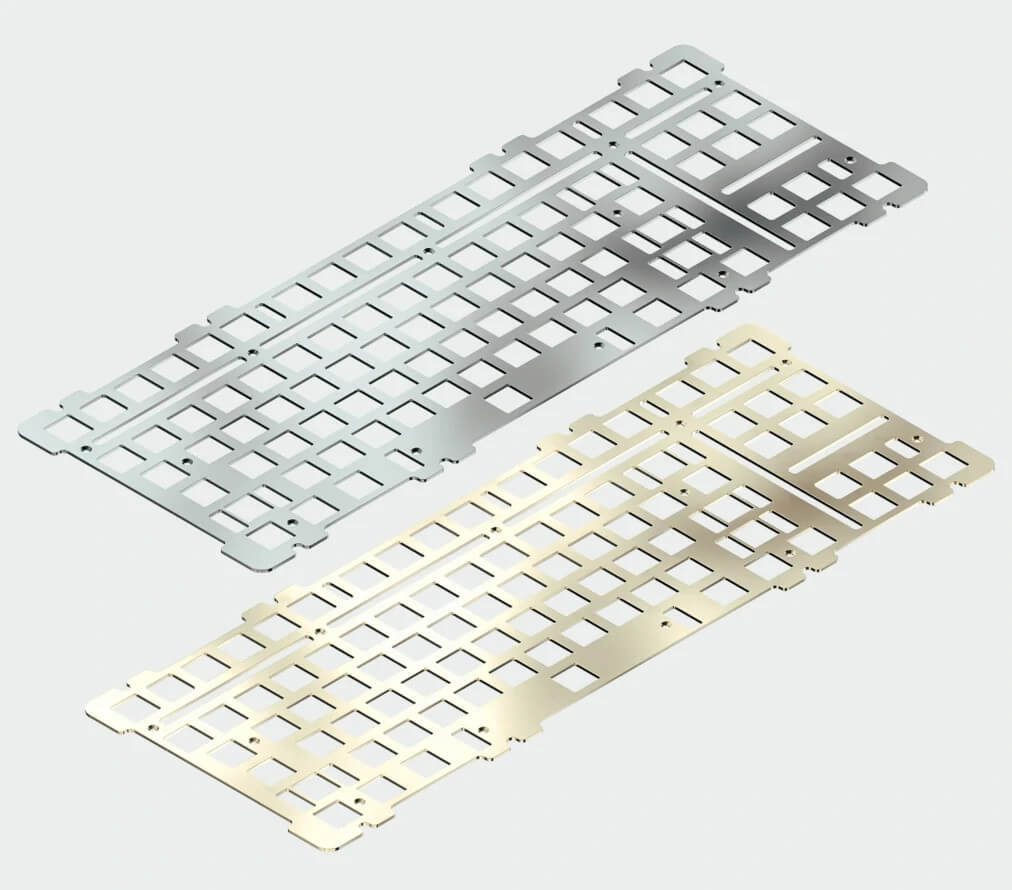
The sound signatures of keyboards is a passionately debated topic among enthusiasts. The plate and the case have a noticeable effect on how the keyboard feels and sounds. For instance, less dense and more flexible materials like polyoxymethylene (POM), polycarbonate, FR4 and carbon fibre have a lower pitched sound. Some plates have extra cut outs in them to enhance flexibility when bottoming-out keys. Dampening materials may also be placed strategically for a muted sound profile.
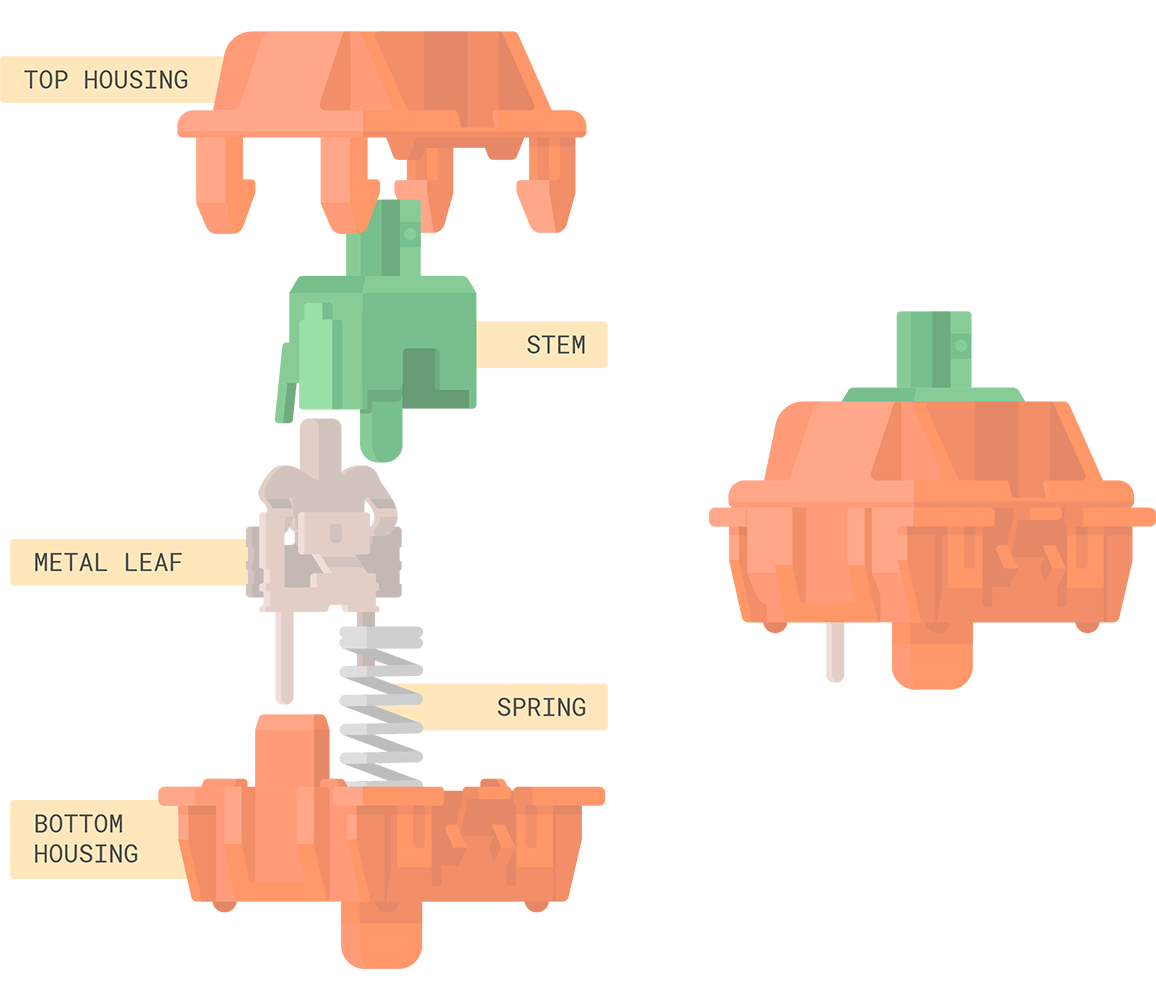
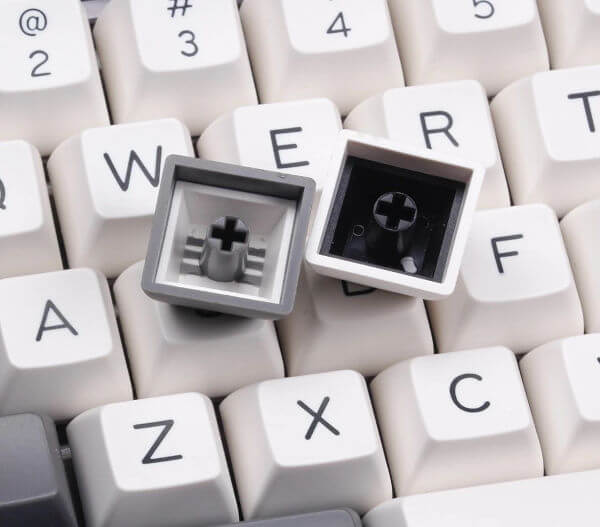
Switches
A keyboard switch is a mechanism that registers a key press and signals the PCB, which then processes the input and sends it to the computer.
Switches define the character of the keyboard in terms of its sound and tactility. Switches typically have an expected or rated lifespan of over 50 million actuations.[2] Their reliability and durability adds to the appeal of mechanical keyboards.
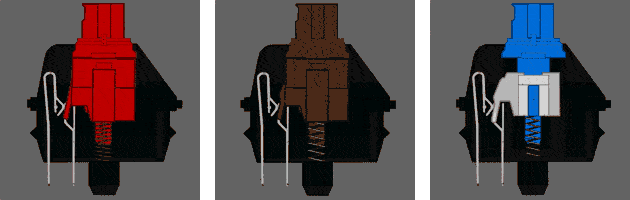
Cherry MX style switches are used in most mass-produced mechanical keyboards. Ever since the expiry of Cherry’s patent that protected its switch design,[3] there’s been an explosion in not just clones but modifications and improvements to the original. Companies like Kailh, Gateron, JWK and many others, manufacture Cherry MX style switches.
There are plenty of switch designs that are fundamentally different to Cherry MX style switches such as capacitive, electromagnetic, optoelectronic, reed, buckling spring etc. For instance, switches from Topre[4] and Alps[5] are incompatible with the Cherry MX design. For reasons of simplicity, I only cover Cherry MX style switches in this article.
Switches are broadly categorized as:
-
Linear: has a smooth, uninterrupted travel until the key bottoms out.
-
Tactile: has a tactile bump before the key bottoms out.
-
Clicky: has an audible click in addition to the tactile bump.
Quieter versions of tactile and linear switches are referred to as silent switches. Switches vary based on the materials used, their design and parameters like actuation force, tactility, pre-travel and total-travel distance.
The housings and stems in switches are made from different types of thermoplastics such as polyoxymethylene (POM), polycarbonate, nylon or polyethylene with varying degrees of purity.[6] The materials used here have an influence on the cost of the switch as well as its feel and sound.
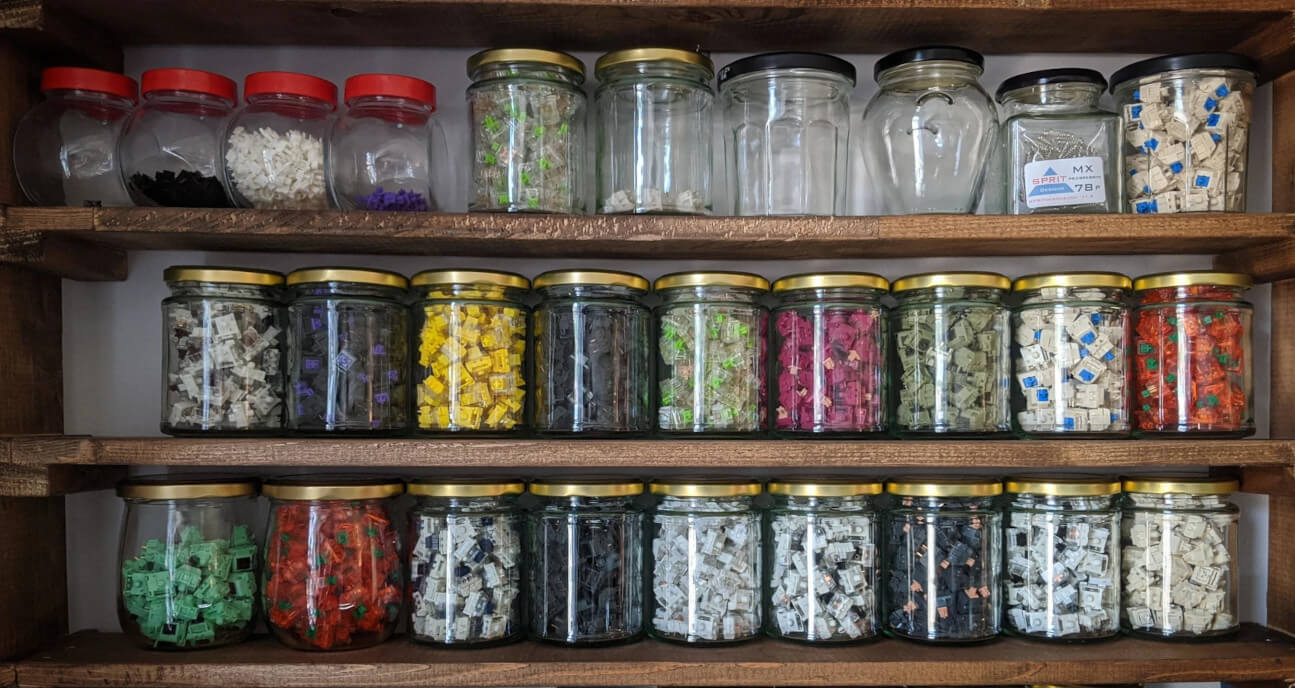
Since there’s one switch per key, it’s possible to use different switches for different keys. For instance, a heavy, linear switch for the spacebar and tactile switches for the alphanumeric keys. If you’re willing to experiment, you can even mix and match parts from different switches creating a “frankenswitch” to your own liking.
Despite an innumerable choice of switches these days, they are the most divisive subject when it comes to custom keyboards, akin to one’s political and religious beliefs. Keyboard zealots fail to consider that not everybody has the luxury to try a hundred different switches before making an “informed” decision, and that there is always a certain degree of subjectivity present. While there are sites that sell switch-tester kits, their cost and lack of availability is often a constraint.
Stabilizers
Stabilizers or ‘stabs’ are mechanisms used under the keycaps of larger keys for consistent and balanced actuation of the switch across the entire surface of the keycap. Lubricated stabilizers also help to attenuate rattling on key presses.
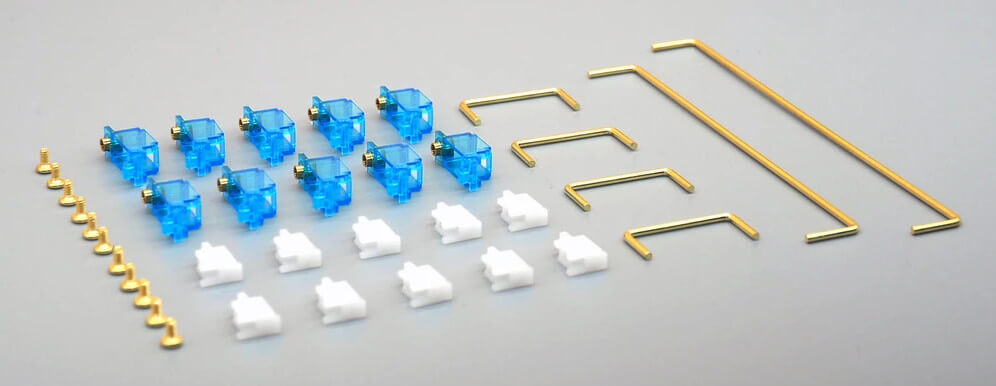
Any key that is 2u (units) or larger in size require a stabilizer. Alphanumeric keys are 1u or 1 unit in size. So the larger keys are the spacebar, shift, backspace and enter on a typical ANSI layout keyboard. Stabilizers are either PCB-mounted (snap-in or screwed) or plate-mounted (snap-in), so they must be chosen such that they’re compatible with the rest of the parts.
Companies like Durock, GMK, Gateron and several others offer stabilizers, with some of the more expensive ones being gold plated.[7]
Switch films
Switch films are a thin layer of padding sandwiched between the top and bottom housing of switches to prevent them from wobbling while typing.
Switch films were originally invented to fix the wobble that developed over time with Cherry vintage black switches. Not all switches require the use of films. However, it’s not uncommon to get a batch of switches with slightly loose housings. Switch films help address this inconsistency by tightening up the gap. An added bonus is that they also alter the sound resulting in a lower pitched sound.

Switch films are typically made using polycarbonate or specialized rubber, and come in different thicknesses ranging from about 0.1mm to .3mm.
You can check the tightness after mounting the switch and then decide if you should bother adding a film.
Lubricants
Lubricating certain parts of the keyboard is a common technique in the pursuit of the ever-elusive, perfect keyboard.
Stabilizers and switches are lubricated with suitable non-conductive lubricants to reduce friction, wobble and improve smoothness when typing. Lubricants differ by their viscosity and consistency. The most commonly used lubricants are from Krytox and Tribosys. Thick dielectric grease can be a cheaper alternative for lubricating stabilizers but might not produce identical results as using the specialized lubricants.
Be advised that not all switches take well to lubrication. Tactile and clicky switches should be carefully lubricated so as to not affect their tactility. Linear switches on the other hand, are more forgiving and benefit from lubricating all points of friction.
Different parts benefit from different types of lubricants. Experimentation and having a keen eye ’n a ear for details helps. How to lubricate switches is something I might cover in a later article.
Keycaps
Keycaps are what we press with our fingers while typing. They are mounted over the switches and can easily be replaced. Keycaps, switches and the PCB should be chosen such that they’re all compatible.
The two main types of plastics used to make keycaps are ABS (Acrylonitrile Butadiene Styrene) and PBT (Polybutylene Terephthalate). Both have their pros and cons but that’s a topic worthy of a separate, in-depth discussion. Keycaps aren’t just about making the keyboard look pretty, but also affect the sound, feel and quality of the overall keyboard.
Keycaps are sold in sets to cover all keys on a keyboard. But with dozens of different layouts, not all keycap sets will cover all layouts. Keycap sets that offer the most choices among layouts or with a lot of novelty keys tend to be more expensive. When buying a set of keycaps you need to consider the following:
-
Mounting: The compatibility with switches (Cherry MX, Alps, Topre etc.)
-
Layout: The layout suitable for your keyboard (ISO, ANSI etc.)
-
Material: The material of the keycaps (ABS, PBT, POM etc.)
-
Printing: The technique used to print the keycap (pad printing, dye-sublimation, double-shot injection moulding, laser marking etc.)
-
Thickness: The thickness of the walls of keycaps.
-
Profile: The shape profile of the keycaps (Cherry, OEM etc.)
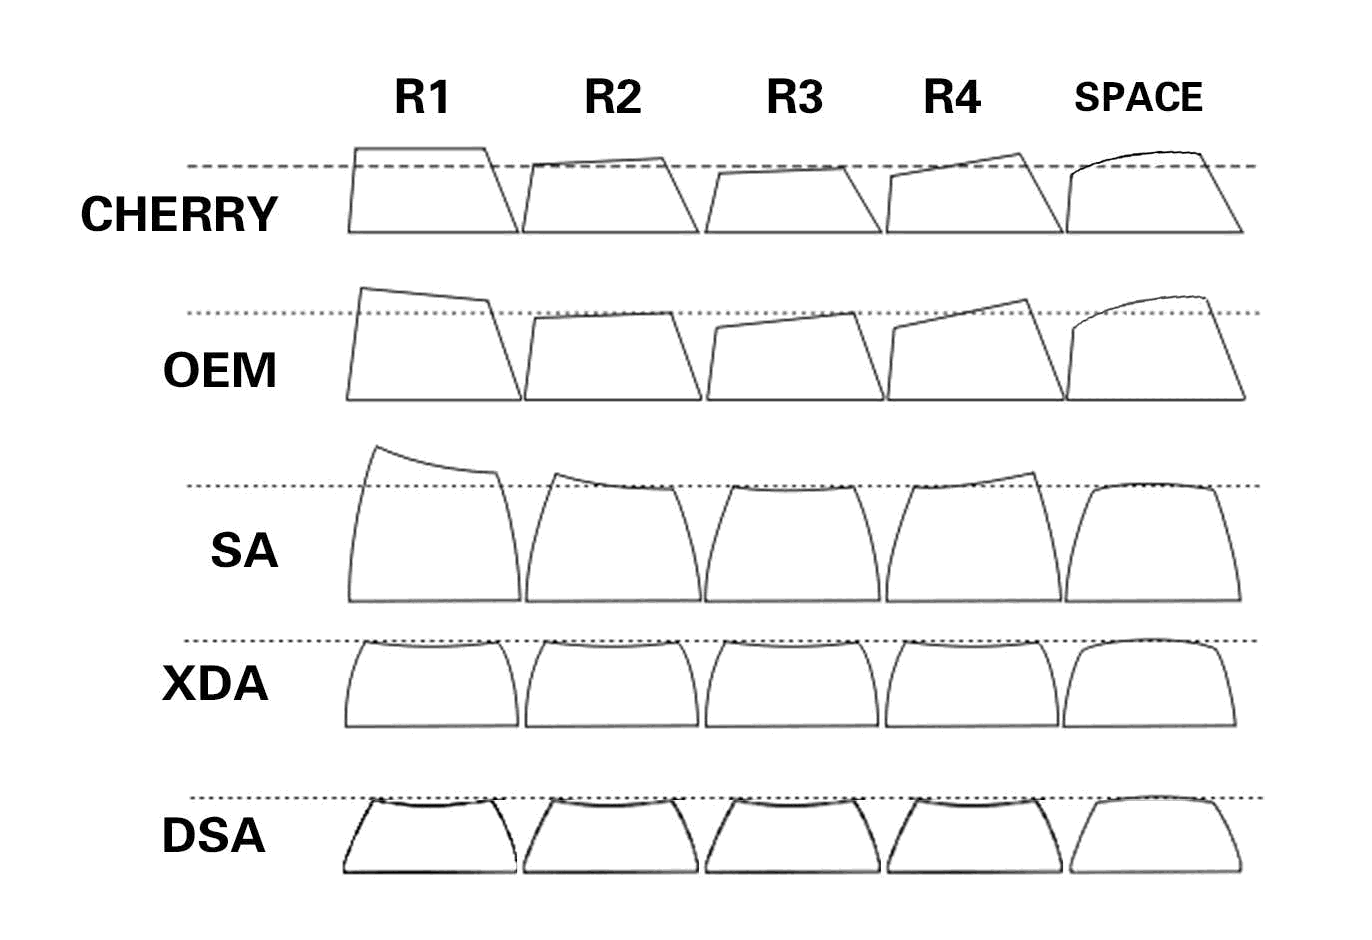
There are many more keycap profiles that are available today (like MT3) that have gained a sizable following in the community.
It’s difficult to judge what’s a good profile merely based on reviews. You need to try them out yourself. Since keycaps are easily replaceable, experiment with different sets and profiles if possible. For more details on keycap profiles, their dimensions and comparisons, visit keycaps.info.
Artisan keycaps
Artisan keycaps are custom keycaps meant to personalize and spruce up keyboards. They are sold as individual keys rather than as a set. They favor aesthetics over functionality and aren’t always designed to be typed with. So artisan keycaps are used on infrequently used keys like escape, print-screen, scroll lock, pause etc.
Artisan keycaps are 3D-printed or hand-crafted. They are made using resin, metal, wood, plastic or just about any other material. They come in a vast variety of shapes, styles, colors, and textures. Naturally, they tend to be more expensive than regular keycaps due to the labour involved.
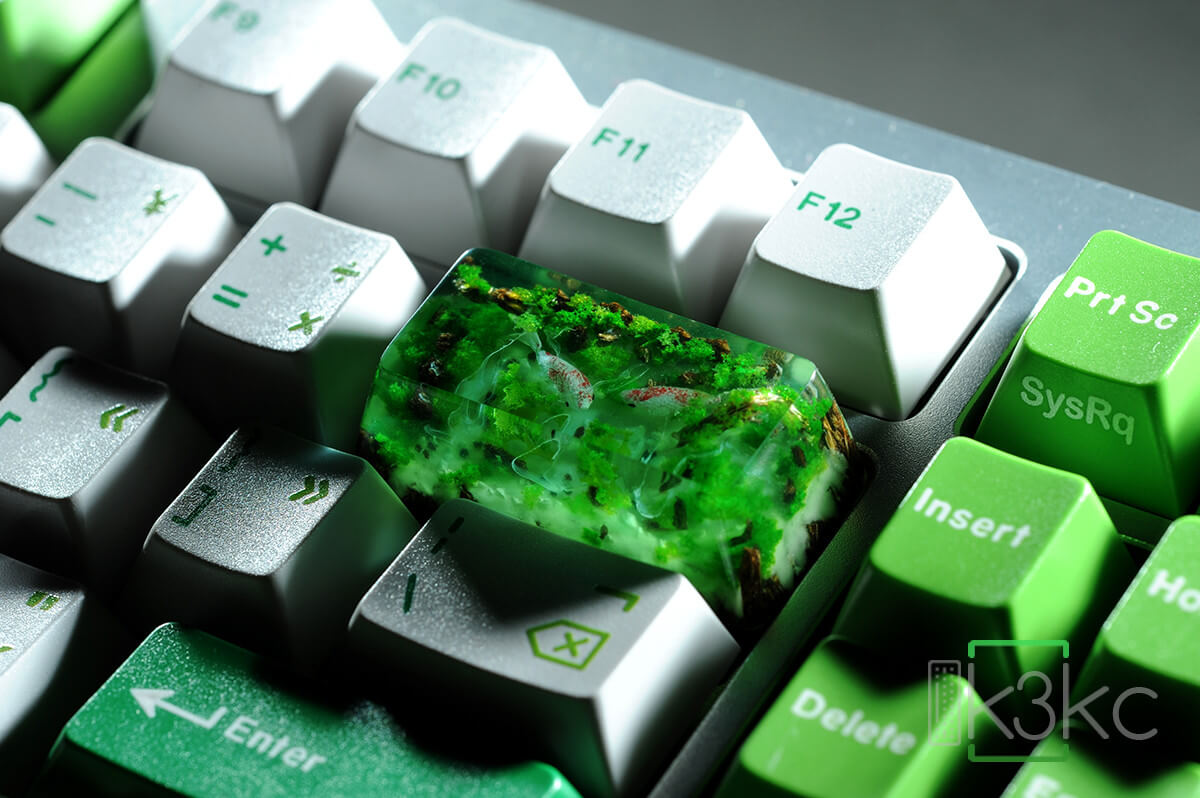
The aquarium keycap is advertised as a unique keycap, meaning it won’t be remade once sold. While it’s an amazing piece of art, the exclusivity factor pushes the price up to a hefty $500. However, not all artisan keycaps are unique, one-of-a-kind items. For instance, this cute cat-in-a-box keycap (pictured below) is priced at a more reasonable rate of $8.

With artisan keycaps, the weight of the keycap needs to be taken into consideration. This is so that the key doesn’t actuate by buckling under the weight of the keycap itself.
Artisan keycaps are quite popular these days with far more affordable options. With practically thousands of designs and new ones coming out every day, they have spawned a sub-market of inexpensive as well as rare and collectible items.
Customizing Cables
Unlike mass-produced keyboards, custom keyboards almost always have detachable cables. Given the terrible quality of cables are in mass-produced products these days, being able to choose the cable yourself is a substantial advantage. And thus, customizing these cables are a thing.
Custom keyboard cables are, for the most part, a purely aesthetic decision. However, the split cable design (with the aviator style detachable connectors) shown below are useful if you’re switching keyboards fairly often. Sometimes they are paired with magnetic USB connectors as well.
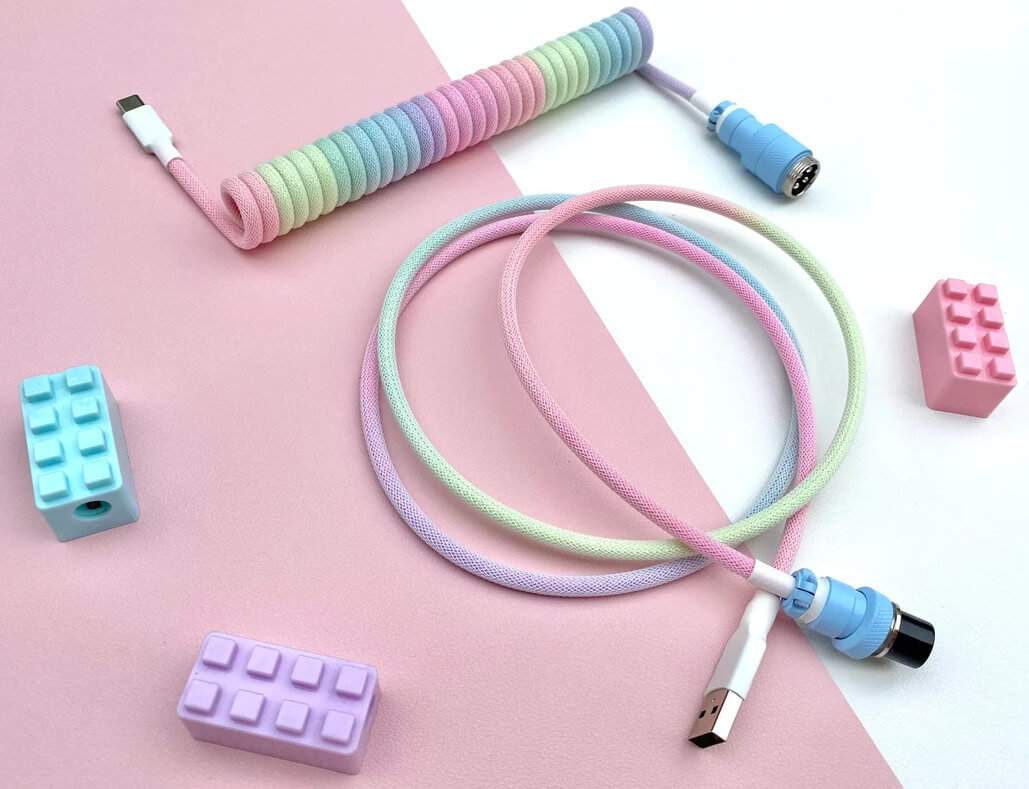
Cables too have a wide range of customization options and prices. Some of the sleeker looking detachable connectors (like Lemo) can be quite expensive. Higher quality cables tend to use paracord which was original designed for suspension lines in parachutes. These braided cables are more flexible and stronger than regular nylon or polyester. Naturally, they’re more expensive as well but worth it as they tend to last forever.
There are plenty of enthusiasts and companies offering these custom cables and you shouldn’t have problems getting one in most countries.
Conclusion
It’s easy to get overwhelmed by the sheer amount of tweaks, hacks and modifications. But it’s important to realize that there’s no such thing as the best keyboard, or the best switch, or the best keycap set. A lot of it comes down to personal preference. What you want from your keyboard can be drastically different from what others want. As it is with most hobbies, there is a point of diminishing returns. And that point is different for different people. For some a $1000 keyboard is worth it and for others the price doesn’t justify its quality. It’s ultimately up to you to decide what’s of value to you.
Rather than diving into the world of mechanical keyboards, start by dipping the tip of your toes.
-
Do as much research as you can first before spending anything.
-
Read from multiple sources and get a diverse set of opinions.
-
Build up your preferences with inexpensive options first wherever possible.
-
If possible, try other people’s keyboards through local meetups or conventions.
-
Don’t fall for the hype — passionate people tend to overhype things.
-
Be prepared to read the words “out of stock” over and over.
-
It’s okay to like Cherry MX browns.